

ArduinoPixel

Mô tả của ArduinoPixel
Control your NeoPixel LED strip from your phone or tablet.
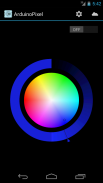
Change the strip's color, continuously, and in real-time... turn it on and off... all, from the convenience of your Android device.
Getting started is really easy:
* Take an Arduino Ethernet and a NeoPixel LED strip.
* Upload the provided code on the Arduino, https://codebender.cc/sketch:31742. (Read the comments for instructions.)
* Connect the Arduino to your local network.
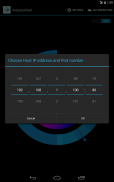
* Install the app, go to settings and specify the network parameters for your Arduino Web Server. If you see the "Hello from Arduino Server" message, then you know the setup is correct.
That's it! Enjoy
--------------------------------------------------------------------------------
Update:
I developed ArduinoPixel for personal use, but then I decided to share it. The app offers only those features I needed at that moment, realizing though that NeoPixels can do much more interesting things than simply light up. By now, enough people have used the app and responded with some positive feedback and ideas that I wanted to do something about it. In the near future, I intend to start working on the app again. If you have any requests and features you'd like to see implemented, please send me an email and tell me about them. I'll make sure to take your input into account.
Some ideas I have in mind about the project/app:
* Develop a web interface to allow the use from a web browser
* Set the turn on/off times of the strip in order to operate autonomously
* Allow the use of multiple strips
* Set two colors and a period of time, so that the strip can gradually cycle between them
* Add support for the $3 ESP8266 WiFi enabled boards
</div> <div jsname="WJz9Hc" style="display:none">Kiểm soát NeoPixel LED strip của bạn từ điện thoại hoặc máy tính bảng của bạn.
Thay đổi màu sắc của dải, liên tục, và trong thời gian thực ... bật và tắt ... tất cả, từ sự tiện lợi của thiết bị Android của bạn.
Bắt đầu là thực sự dễ dàng:
* Lấy một Ethernet Arduino và một dải NeoPixel LED.
* Tải lên các mã được cung cấp trên Arduino, https://codebender.cc/sketch:31742. (Đọc các ý kiến để được hướng dẫn.)
* Kết nối các Arduino đến mạng nội bộ của bạn.
* Cài đặt các ứng dụng, đi đến thiết lập và xác định các thông số mạng cho Web Server Arduino của bạn. Nếu bạn nhìn thấy "Hello từ Arduino Server" tin nhắn, sau đó bạn biết thiết lập là đúng.
Vậy đó! Thưởng thức
-------------------------------------------------- ------------------------------
Cập nhật:
Tôi phát triển ArduinoPixel cho sử dụng cá nhân, nhưng sau đó tôi quyết định chia sẻ nó. Ứng dụng cung cấp chỉ có những tính năng mà tôi cần thiết ở thời điểm đó, nhận ra rằng mặc dù NeoPixels có thể làm nhiều điều thú vị hơn so với chỉ đơn giản là sáng lên. Bởi bây giờ, đủ người đã sử dụng các ứng dụng và đáp lại bằng một số phản hồi tích cực và ý tưởng mà tôi muốn làm một cái gì đó về nó. Trong tương lai gần, tôi dự định sẽ bắt đầu làm việc trên các ứng dụng một lần nữa. Nếu bạn có bất kỳ yêu cầu và tính năng mà bạn muốn xem thực hiện, xin vui lòng gửi cho tôi một email và cho tôi biết về họ. Tôi sẽ làm cho chắc chắn để có đầu vào của bạn vào tài khoản.
Một số ý tưởng tôi có trong tâm trí về dự án / ứng dụng:
* Xây dựng một giao diện web cho phép sử dụng từ một trình duyệt web
* Thiết lập bật / tắt lần của dải để hoạt động tự chủ
* Cho phép sử dụng nhiều dải
* Đặt hai màu sắc và một khoảng thời gian, vì vậy mà các dải có thể dần dần chu kỳ giữa chúng
* Thêm hỗ trợ cho $ 3 ESP8266 WiFi kích hoạt bảng</div> <div class="show-more-end">


